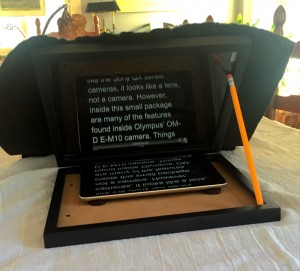
My homemade teleprompter is ready for its debut! As I wrote the other day about my interest in making my own teleprompter to use with my iPad Mini 3 running teleprompter software, I found a two-frame 8X10 set at a local hobby store to use for this DIY project. I was very excited to find this set because it meant the two frames were already connected with nice solid hinges.

As I began to prepare the frames for their new job, I realized that unlike the frames Vinvin121 used in his YouTube video (see previous post), my frames had backings that slid into a slot in the bottom of the inside of the frame and two metal latches that slide in and out of the top. This assumes that the glass and mat are inside, so when I remove the backing and mat from one frame, I cannot secure the glass properly. It is not such a problem with the frame in which I am removing the glass and mat. There are few ways to solve this minor problem. I chose to use glue and tape. I put very small dabs of glue in each corner of the frame and in the middle of each side. This is where the glass will rest. Once I laid the glass in place, I put some items on it to weigh it down to allow the glue to dry. I left it this way for about an hour. Not sure that the glue alone would hold the glass, I cut four pieces of black, electrical tape and attached it to the glass and inside of the frame. Not particularly attractive, but it works. In order to make it look a bit more finished and to secure the glass to the frame even more, I may tape all sides with black gaffers tape to finish it off. I cut a short piece and taped it to one side of the frame to test this idea.
The other frame is where my iPad Mini will rest and by using an 8X10 frame, I will be able to use my regular sized iPad 3 if I decide to do so. I removed the glass and mat from this frame and reinserted the backing in its slot. I may want to drill a hole in this backing so that I can attach the teleprompter set to a tripod so I want to raise up my iPad from the backing to allow for a nut to secure such an attachment. Though Vinvin121 used rubber washers, I opted for the felt pads you put on chair leg bottoms to keep the chair from scratching wooden floors. I have a lot of these on hand, so that was a no brainer. I marked where the corners of my iPad would be when the iPad is positioned as I want it in the teleprompter and stuck the pads just inside those marks.
Originally, I thought I would use a wooden dowel to support the frame with the glass for reflecting the scrolling teleprompter at a 45 degree angle. I then remembered I had a bunch of unsharpened, wooden pencils and realized one of them would work just as well! The bottom of the pencil goes against the inside of the frame and the other end has a rubber eraser that means it won’t slip on the glass. This allows me to position the glass at the best angle depending on where I set the teleprompter. It also means I don’t have to drill any holes in the frames! Wow! Except for having to glue the glass in place, this project has turned out to be incredibly easy to finish! Throw in some pennies for the pencil, glue, and tape, the whole setup cost me $9.10!
I hope to put my new teleprompter to work this week. I plan to do a series of videos on the Olympus Air A01 camera, but also want to do videos on other topics as well. As you can see in the accompanying video, it works great when I drape a black cloth (had that already too!) over the back. The cloth will cover the camera that will point through the teleprompter glass as well as the back of the teleprompter. This will increase the visibility of the mirrored text scrolling on the iPad and being reflected onto the piece of glass.
If you would be interested in virtual tutoring sessions using either Skype or Google Hangouts, please drop me and e-mail or leave a private message to me on Facebook or Google+.
Please leave me questions or comments on my Facebook page (https://www.facebook.com/billbooz) or on Google+ (http://plus.google.com/+BillBooz). I look forward to interacting with you!
Check out my free eBook on Mastering Your Camera's Priority Modes: http://www.infotor.com/ebooks. Download and enjoy!
I am available to do one-on-one tutoring or small group lessons designed to meet YOUR needs and what you want to learn in the area of photography, using flashes, or the use of Apple products and software. Give yourself the gift of learning: http://www.infotor.com/photoclasses! And check out my tutoring bundle: http://www.infotor.com/photoclasses/tutoringbundle.php as well. A PDF of my brochure is at http://www.infotor.com/photoclasses/brochures/WHBI_2015-16Brochure.pdf.


